Getting root/administrator on a Windows XP
*********************************************************************
Well this is my old school trick, the Sticky keys hack. I kindof discovered (though I wasnt the first person to do it, but it was pretty less known hack a few years back) it years back, and I am surprised to see that it still works. This is not a one-click kiddie stuff, though its simple and easy.
In the end, I will also show you how to stay STEALTHY and cover your tracks.(to some extent)
Let me explain you the case precisely:
You have a guest account or any other NON-ADMINISTRATOR account.
And you want admin privileges. Naturally I assume, your admin doesnot want to share the admin password with you.
There is ATLEAST ONE CONDITION for this hack to work (apart from this, I aint aware of any):
Your non-admin account must have write permissions for the system32 directory. That is you should be able to write/modify any simple file in the system32 directory.
Dont worry, we are not going to mess with the ugly SAM and SYSTEM files.
Now I would like to explain some basic mechanics, if you are not interested you may skip it. But if you understand it, I believe you should be able to find many such hacks.
Basic mechanics:
***************************
When a user logs in, and a process is executed, it runs generally with the privileges on the current user. So if you are the user named "Guest" and you run a firefox exe,
in the task manager, under the process list you can see the username as "Guest" for the firefox exe. Now if no user is logged on, and a process is executed, then what will happen?
Our best guess is that it would run with system privilege. So if you can find a file that runs/can be made to run before a user logs in, then it should do our dirty job.
Sometimes it happens that certain softwares like to run their files before a user logs on. If somehow we could replace such files with our shell or any bat file, our dirty job
could be done again :). But its not that easy. The shell is not necessarily executed as expected. Nevertheless, its a possibility. If you like to experiment you can try to find any such files. I ll let you know later,
how to get a sample list of such files.
The Sticky keys Hack
**********************************
There is something called Sticky keys in Windows XP. If you press SHIFT key >=5 times, a window should pop up,
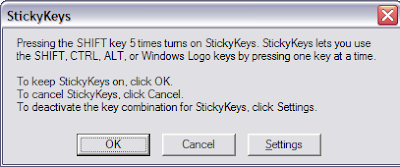
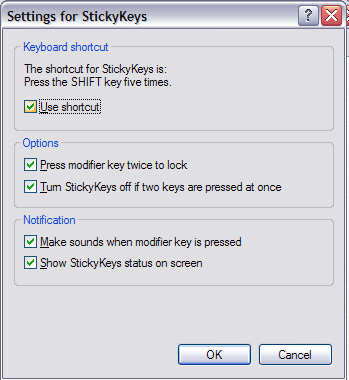
if it doesnt, you can enable its shortcut through Control panel->Accessbility Options-> KeyBoard Tab, in the Sticky Keys group, click on Settings, under Keyboard shortcuts,
check the setting for "Use shortcut". Good news is that you can enable it from a Guest account as well:
Now if you press SHIFT >=5 times, the file responsible for firing this window is under system32 with the name sethc.exe
You got it, take the backup of this sethc.exe and rename it to say sethc_original.exe. Now copy cmd.exe from system32 to somewhere and rename it as sethc.exe.
Copy the new sethc.exe (which is in fact cmd.exe, our shell) in system32, and press yes, when it asks for the confirmation to overwrite.
You can test by pressing SHIFT >=5 times, and you will see a command window being opened. Its not of much use since the privilege of this shell is the Guest or the
no-admin only.
(We cannot use the following commands from the Guest account,unless we have the admin/system privilege, if you try to do that, you will see an error of type:)
To escalate the privilege, restart you windows, but do not login to any account. And when you are at the logon screen,
press the SHIFT key>=5 times and boom, there you got you shell with SYSTEM privileges.
Now you can add a new administrator account "hacked" with a password "hax0rpassw0rd" using the commands:
net user hacked "hax0rpassw0rd" /add
net localgroup administrators hacked /add
And now you can logon to your new admin account now.
You can also reset the administrator password, using the shell, but I wont recommend that for obvious reasons. Our job should be to stay as stealthy as possible.
Just install your software and clear your tracks. Wwith this SYSTEM privilege shell you can also see the files that execute before a user logs in.
Use the command tasklist for that and save the output in some file, for later viewing.
How to stay stealthy.
****************************
Your new account can be easily seen in the Control Panel-> User accounts and in the My Computer in the form of documents as well. This isnt a good sign.
But we can hide our account to a certain extent.
Beware of the Registry, Dont mess around!
Open the registry by regedit, and navigate to the Folder:
HKEY_LOGON_MACHINE->Software->Microsoft->Windows NT->Current Version->WinLogon->SpecialAccounts->UserList
Create a new DWORD value here, set the name as your newly added username, "hacked" in our example, and let the value be zero.

This will stop the display of your user account in Control Panel->User accounts and in the My Computer documents.
However for the expert eyes, your user directories can still be seen in "Documents and Settings" and through the command net user.
So you may need to do some additional tasks, like removing your backdoor account entirely before leaving.
*********************************************************************
Well this is my old school trick, the Sticky keys hack. I kindof discovered (though I wasnt the first person to do it, but it was pretty less known hack a few years back) it years back, and I am surprised to see that it still works. This is not a one-click kiddie stuff, though its simple and easy.
In the end, I will also show you how to stay STEALTHY and cover your tracks.(to some extent)
Let me explain you the case precisely:
You have a guest account or any other NON-ADMINISTRATOR account.
And you want admin privileges. Naturally I assume, your admin doesnot want to share the admin password with you.
There is ATLEAST ONE CONDITION for this hack to work (apart from this, I aint aware of any):
Your non-admin account must have write permissions for the system32 directory. That is you should be able to write/modify any simple file in the system32 directory.
Dont worry, we are not going to mess with the ugly SAM and SYSTEM files.
Now I would like to explain some basic mechanics, if you are not interested you may skip it. But if you understand it, I believe you should be able to find many such hacks.
Basic mechanics:
***************************
When a user logs in, and a process is executed, it runs generally with the privileges on the current user. So if you are the user named "Guest" and you run a firefox exe,
in the task manager, under the process list you can see the username as "Guest" for the firefox exe. Now if no user is logged on, and a process is executed, then what will happen?
Our best guess is that it would run with system privilege. So if you can find a file that runs/can be made to run before a user logs in, then it should do our dirty job.
Sometimes it happens that certain softwares like to run their files before a user logs on. If somehow we could replace such files with our shell or any bat file, our dirty job
could be done again :). But its not that easy. The shell is not necessarily executed as expected. Nevertheless, its a possibility. If you like to experiment you can try to find any such files. I ll let you know later,
how to get a sample list of such files.
The Sticky keys Hack
**********************************
There is something called Sticky keys in Windows XP. If you press SHIFT key >=5 times, a window should pop up,

check the setting for "Use shortcut". Good news is that you can enable it from a Guest account as well:

Now if you press SHIFT >=5 times, the file responsible for firing this window is under system32 with the name sethc.exe
You got it, take the backup of this sethc.exe and rename it to say sethc_original.exe. Now copy cmd.exe from system32 to somewhere and rename it as sethc.exe.
Copy the new sethc.exe (which is in fact cmd.exe, our shell) in system32, and press yes, when it asks for the confirmation to overwrite.
You can test by pressing SHIFT >=5 times, and you will see a command window being opened. Its not of much use since the privilege of this shell is the Guest or the
no-admin only.
(We cannot use the following commands from the Guest account,unless we have the admin/system privilege, if you try to do that, you will see an error of type:)

To escalate the privilege, restart you windows, but do not login to any account. And when you are at the logon screen,
press the SHIFT key>=5 times and boom, there you got you shell with SYSTEM privileges.
Now you can add a new administrator account "hacked" with a password "hax0rpassw0rd" using the commands:
net user hacked "hax0rpassw0rd" /add
net localgroup administrators hacked /add

And now you can logon to your new admin account now.
You can also reset the administrator password, using the shell, but I wont recommend that for obvious reasons. Our job should be to stay as stealthy as possible.
Just install your software and clear your tracks. Wwith this SYSTEM privilege shell you can also see the files that execute before a user logs in.
Use the command tasklist for that and save the output in some file, for later viewing.
How to stay stealthy.
****************************
Your new account can be easily seen in the Control Panel-> User accounts and in the My Computer in the form of documents as well. This isnt a good sign.

But we can hide our account to a certain extent.
Beware of the Registry, Dont mess around!
Open the registry by regedit, and navigate to the Folder:
HKEY_LOGON_MACHINE->Software->Microsoft->Windows NT->Current Version->WinLogon->SpecialAccounts->UserList
Create a new DWORD value here, set the name as your newly added username, "hacked" in our example, and let the value be zero.

This will stop the display of your user account in Control Panel->User accounts and in the My Computer documents.
However for the expert eyes, your user directories can still be seen in "Documents and Settings" and through the command net user.
So you may need to do some additional tasks, like removing your backdoor account entirely before leaving.
